Replacing the Tyres on a Lease Vehicle
One of the most important things to remember when it comes to safety, your vehicle and driving on the road, is the condition of your tyres. But when it comes to driving a lease vehicle, many drivers are unsure whose responsibility is it to replace the tyres on a lease vehicle?
“Tyres are the only point of contact between a car and the road. Insufficient tread depth, incorrect tyre pressures and damaged tyres can lead to your safety being jeopardised, putting you and your family at risk.”

To help explain the rules around tyre replacement, stock car leasing specialist, Nationwide Vehicle Contracts, has put together a short guide to explain whose responsibility is it to replace the tyres on a lease vehicle and what tyre brands are permitted.
We have also included detail on how to spot when a tyre needs changing alongside how to safely change one.
Tyre Maintenance
For drivers who take out a car lease special offer with Nationwide Vehicle Contracts, you have the option to include a maintenance package in the contract for a fixed monthly fee so you can rest assured that you have complete cover during the term of your contract.
Full details of the Maintenance Package can be found here, and it includes all routine servicing, replacement tyres (depending on funder) and other repair costs that might be required during the length of the leasing contract. This is addition to the to full UK manufacturer's warranty and at least 12 months roadside assistance and recovery that come with all new vehicles as standard.
When it comes to tyres, a maintenance contract may also include:
- Unlimited Premium Branded tyre replacements including valve and balance
- Free mobile tyre fitting service at a convenient location for you by appointment
- No recharges for punctures or damaged tyres (dependent upon finance provider)
It doesn't include:
- Repairs or replacements due to driver error or driver induced faults
- Vandalised and Stolen Wheels and/or Tyres
If you don't have a maintenance contract, replacement of tyres is down to you and it is advisable for you to ensure that the correct standard and make of tyres is fitted to the vehicle, as fitting part-worn tyres - even if you may be unaware that they are part-worn - can be dangerous. The state and condition of the tyres is also taken into consideration when the car is returned at the end of the lease too.
Changing a tyre - Step by step guide
Tyre changing equipment
- A jack
- A wheel wrench
- A clean cloth
- A spare wheel and a car to put it on

Step one - Safety
Park your vehicle on level ground as far away from traffic as possible. If it's dark, ensure that you are wearing a high-visibility jacket and using a torch. If near traffic, turn on your hazard lights. Any passengers should also get out of the car, and any heavy luggage will need to be removed.
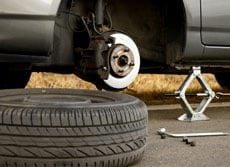
Step two - Removing a wheel
Remove any wheel cover or centre cap to gain access to the wheel nuts, and give each one a ½ turn with your wheel wrench. Then place your jack under the jacking point nearest the wheel – these points vary from vehicle to vehicle and will be indicated in your owner’s manual, so it’s important to know where they are ahead of time. Failure to place the jack properly can cause damage to the car and may provide an unstable lift. Turn the jack handle clockwise until you have raised the wheel completely off the ground. Remove the wheel nuts and remove the tyre.

Step three - Fitting the replacement
Lift the replacement up onto the mounting surface and tighten all of the wheel nuts with your fingers. To ensure perfect alignment, you should tighten the nuts further (but not fully) in the order shown in the image - if drawn out, the order looks like a five pointed star.

Step four - Finishing up
Lower the car by turning the jack handle anti-clockwise until the wheel is resting on the ground and the jack can be removed. Give those nuts a last turn (using the same pattern above) to ensure everything is secure, and make sure you pack everything back into the vehicle.
Tyre changing video
The only thing that’s easier to follow than a step-by-step guide is a video of a step-by-step guide. Check out the entire process in the video below.
Obviously, driving with worn or damaged tyres is dangerous - to you, your passengers, other road users and pedestrians - but it is also illegal. You run the risk of not only being involved in an accident but also invalidating your car insurance policy.
If you are caught driving with illegal tyres, you may be:
- Issued with a fixed penalty notice of up to £100 for each defective tyre
- Summoned to court for prosecution where you can be fined up to £2,500 and get three penalty points for each illegal tyre (£5,000 in the case of a goods vehicle or a vehicle constructed or adapted to carry more than eight passengers)
- Summoned to court for prosecution where you can be disqualified from driving in certain circumstances
Tyre rotation
With clear laws about tread depth and tyre damage (see below for the latter), it’s important to emphasise that these limits represent the extremes of wear and that you should consider changing well before wear and damage become an issue.
Changing tyres has traditionally been part of routine maintenance for two reasons:
- You may want to change to a seasonal set to improve performance in dry or cold weather
- In the past, manufacturers recommended that tyres be rotated around periodically to spread wear
The former reason applies less to UK motorists because of the nature of our weather. The latter is now disputed: instead of promoting even wear, some suggest that you should put your worst tread on the front of the car and that it’s best to buy new rears rather than swapping partially worn front tyres to the back.
Common types of tyre damage
Simple 'end of life' wear is not the only reason for changing a tyre. Here are some common examples of causes and consequences that will force you to change:
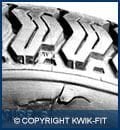
Cuts
Cuts are relatively common and can occur as a result of driving over sharp objects on the road. In UK law, a tyre with a cut in excess of 25mm must be replaced. Any cut that exposes the ply or cord is also illegal – in both cases, there is an increased risk of blowout.
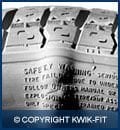
Sidewall impact
Hitting a curb or another obstacle can sometimes cause damage to the casing, either in the form of a cut or bulge. Again, these are a blowout risk.
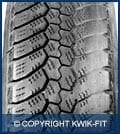
Camber wear
In suspension terms, ‘camber’ refers to the angling of wheels away from the axle. Some set-ups can improve handling, however, tilting wheels in this way tends to cause rapid wear on the edge of the wheel that makes contact with the road.
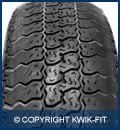
Under-inflation
Under-inflation causes the outer edges to take the load and thus wear more quickly than the centre.
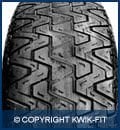
Over-inflation
When filled with too much air, a tyre becomes too rounded, causing the middle to extrude and take the entire weight of the car.

Emergency braking
At high speed, an emergency stop can cause massive friction resulting in rapid wear, potentially to the extent that the tyre punctures and deflates. For this reason, you should always check your tyres at the nearest safe opportunity after performing an emergency stop.
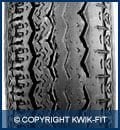
Misalignment
Whereas camber configuration may be desirable, plain old misalignment (where the front wheels are pointed at slightly different angles) rarely results in a better drive, and can cause some rapid wear and feathering on the tread.
Images used courtesy of Kwik-Fit
If you need to replace the tyres on your car leasing hire during the course of your contract, please ensure you use a premium brand such as Pirelli, Michelin, Bridgestone, Continental, Goodyear or Dunlop.
Photo courtesy of Tyresafe.
It is far less common nowadays to be given a full-sized spare that functions as effectively as your main tyres. For space and weight reasons you may have a mini spare (otherwise known as a ‘space saver’), which is good enough to get you home but unsuitable for continued use. Such equipment should not be used to drive above 50mph.
Flat tyres are, to a certain degree, unavoidable. Nevertheless, good maintenance practice and sensible driving decisions should reduce the risk of punctures and blowouts.
- Avoid roads with recent construction activity and rough surfaces
- Look out for obvious puncture hazards while driving, but don’t take evasive action unless you’re sure it’s safe to
- Check your air pressure at least once a month (see below for more information)
- Check for uneven wear and good tread once a week and after any significant knocks
- Don’t overload your vehicle – see ‘how to read a sidewall’ for more information on finding out your maximum load
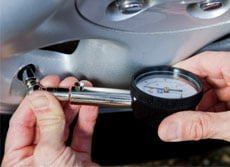
Checking air pressure
Underinflated tyres are a blowout risk because of the increased friction and heat they encounter. Overinflated tyres are more likely to pick up damage from potholes and bumpy roads. Checking your pressure at least once a month could prevent either scenario.
- The ideal PSI (pounds per square inch) is listed in your owner’s manual, on a sticker on the driver side door panel or on the inside of your fuel flap
- If you are carrying a heavy load, the ideal PSI will increase – again, the owner’s manual will help you out
- Use a high-quality air-pressure gauge to measure your current PSI. Visit a petrol station if you don’t own one
- Check when your car has been resting for at least three hours – readings can be thrown off by hot air in the tyres
- Ensure measurement accuracy by having a tight seal between your gauge and the valve – if you hear a hiss, you’re probably not getting an accurate reading, so adjust the gauge
Have further questions about caring for your lease vehicle?
If you have any further questions a
Guide Information
Originally published: 14th September 2016
Last updated: 1st August 2022
